
Working with Players
Players are an integral part of the diagram, containing many properties governing how they are displayed and manipulated. All Players belong to a Position (Quarterback or Linebacker, for example). The Position settings dictate the default properties for a Player when it is first added to a diagram.
A Player in a diagram continues to use its Position’s properties until you explicitly override a property with a setting different from the default value for that player’s Position. For example, let’s say the default symbol forecolor for the Quarterback position is blue. A Quarterback player that is added to a new diagram will display with its abbreviation “QB” in blue. Now, if we were to change the Position settings for the Quarterback position to use red as the forecolor, reopening the diagram would show the Quarterback player with “QB” in red.
However, if you explicitly change the Quarterback in this diagram to use purple as the forecolor, he will have overridden this property, meaning no future changes to the Position settings for Quarterback will ever have an effect on this Quarterback instance’s forecolor (unless the you choose to restore the Position’s default settings).
Adding a Single Player
We will start by adding a single player to the diagram. While this is the most basic method for adding players to a diagram, it is also the most inefficient method for doing so (the preferred method is to copy from previous diagrams). Nevertheless, there may be times when it is just as easy, if not easier, to add a new player in this way.
To add a new player:
Before you begin, note that a least one Position must be defined.
1. Open a diagram for editing.
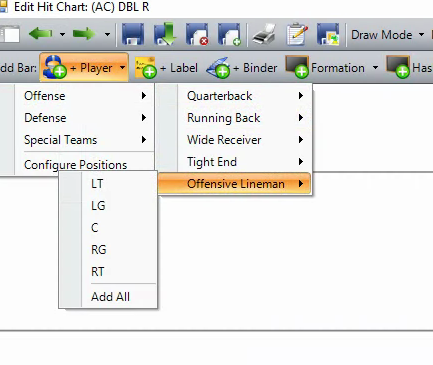
2. Click on the Add Player drop-down arrow to display a listing of the defined Positions in PlayTools. When selecting a Position, the cursor changes to a mouse pointer with blue circle to indicate that the diagram is now in the ‘Wait for New Player’ mode and you must click on the field to place the player(s). You can also add all players in a position group, like the OL or DL, at once by navigating to that position group and choosing Add All.
3. Click on the Field to place a new player (belonging to the selected position) at the location of the click. The new player is automatically selected as the current player.
Use the Esc key (or click outside the Field) to cancel out of ‘Wait for New Player’ mode.
Clicking on the Add Player button itself displays the Configure Positions button.
Editing a Player's Properties
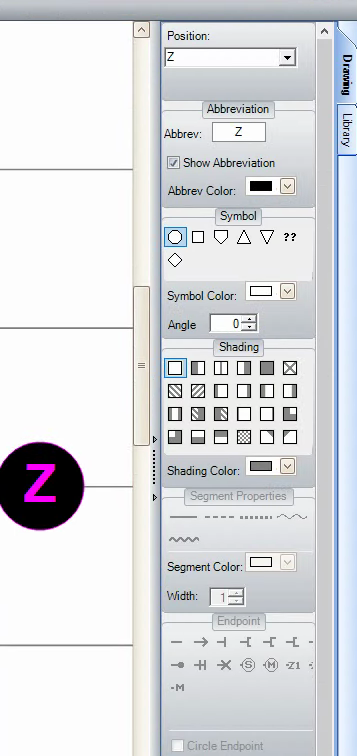
Every Player on a diagram has its own set of properties. These properties can be viewed and modified through the Player’s Properties dialog, or through the Properties Settings area along the right side of the diagram (only the most common Player Properties can be accessed through this area).
A Player has the following assignable properties:
• Position - The Position assigned to a Player. The Position defines a Player’s default attributes and behaviors. You can change the Position of a player already in a diagram (this is sometimes easier than removing a Player and adding another one when “substituting” for players in creating a new play diagram). A Player’s Position can only be changed through the Player Properties dialog. Note that only one Player’s position can be changed at a time.
• Show Abbreviation - While all Players have an Abbreviation, not all players necessarily display their
Abbreviation in a diagram. You can toggle whether or not to display a Player’s Abbreviation through the toolbar on the right side of the diagram.
• Abbreviation - The label shown on the Player’s symbol. There is no limit to the number of characters used in an Abbreviation, but the standard is to only use one or two characters (or numbers). A Player’s Abbreviation can be changed by selecting it and typing in the desired Abbreviation.
• Symbol - The pre-defined graphical Symbols used to represent a Player on the diagram.
• Symbol Color - The color used to “fill” the symbol (PlayTools does not support the notion of transparent symbols). The Symbol Color can be changed through the color picker located in the Symbol toolbar along the right side of the diagram.
• Angle - The angle by which the Player’s Symbol and Abbreviation (if displayed) are rotated. 0° is straight up and angular measurements proceed counter-clockwise (for example, 90° = rotated onto its left side, and 180° = upside-down).
• Shading - The Shading Style is an optional pattern used to graphically convey additional meaning about a player’s role, technique, or alignment. Shading Styles can be changed via the Shading Style toolbar along the right side of the diagram.
• Shading Color - The secondary color used to draw the pattern identified by the selected Shading Style. This property is available through the color picker located above the Shading Style toolbar on the right side of the diagram.
Comments
0 comments
Please sign in to leave a comment.